MYOB Case Study: Setup & Activation of a Security Business

Let us run through the creation of a company file and activation of a security (CCTV, Alarm, Door Access, Digital Door Locks, Service and Repair).

Open MYOB, the MYOB window open. There will be 6 options:
Open Company File | Create File | Explore | What's New | Exit

Click Create a New Company File. The first page of the New Company File Assistantt opens. There will be 8 fields you need to enter information of which 2 is compulsory:
MYOB Serial Number: Required
Company Name: Optional
Business Reg. No.: Required
GST/Sales Tax No.: Optional
Address: Optional
Phone Number: Optional
Fax Number: Optional
Email Address: Optional

The next screen requires you to tell MYOB more about accounting year with 4 steps required (See Field Descriptions for more details):
Current Financial Year | 2014
Last Month of Financial Year | December
Conversion Month | January
Number of Accounting 13

The number of accounting periods was set at 13 because we want an extra column at year end to make adjustments.

The next screen ask you to confirm the information you have entered (see more explantion

Next screen will build the Account Lists for the Security Company. We have elected to use the list provided by MYOB for convenience. For more information see Build Account Lists.

Next screen we select Account Lists. There will be 2 options to select.
| Industry Classification | Type of Business |
We were not able to find the appropriate business type appropriate to a security business so the nearest would be "Electrical Contractor" and add, edit or delete later. See Select your account list for more details.

The final Screen will ask you to confirm the Company File Name and storage location and give you option to change the MYOB default. (see Confirm name and location for more details.)

That done and you can click a tab to go to the Command Center to view the Account Lists you have just created and to Add, Edit or Delete as required.
==========================================

Field Descriptions

Current Financial Year
This is the financial year for which you want to start recording transactions in your company file.
Note that a financial year is represented by the calendar year in which the financial year ends. For example, if your financial year ends in December 2008, your financial year is 2008.
If you want to start entering transactions from your previous or next financial year onwards, enter that year in the Current Financial Year field.
Last Month of Financial Year
This is the month in which your financial year ends. For most businesses the last month is December.
Conversion Month
This is the earliest month for which you want to record transactions. For example, if you want to enter transactions dated 1 September or later, your conversion month is September. You cannot enter transactions dated before the conversion month.
Number of Accounting Periods
You can choose to have 12 or 13 accounting periods. A 13th period is a period for recording entries which you do not want included in the accounting figures for a particular month. For example, you can use it to record year-end adjustments that are attributed to all months. If in doubt, choose 13 periods.

Confirm Your Accounting Information

In this step you need to confirm that the accounting information you have entered is correct. This information cannot be changed once your company file is created, so click the Back button if you need to change any details.
If the information is correct, click Next to continue.

Build Your Accounts List

Accounts are the categories that you will allocate each of your transactions to. When you create a company file, you need to select a default list of accounts. You can:
■ start with an accounts list provided by MYOB. You can select a predefined accounts list suitable for your business.
■ import a list of accounts. You can import an accounts list from another company file or from one that has been provided by your accountant or MYOB partner.
■ build your own list. You can start with an accounts list that has the minimum accounts required by your MYOB software and then add to it.
Note that you can modify your accounts list after creating your company file.

Select Your Accounts List

In this step, select the accounts list that best suits your business.
If you don't find a list that exactly matches your business requirements, select the closest matching accounts list. You'll be able to add, edit and delete the accounts in the list to suit your business's specific needs after your company file is created.

Confirm Company File Name and Location

In this step you need to confirm the name and location of your company file.

Your company file will automatically be given the name that you entered in the Company

Information window of this Assistant and saved in the same location as your MYOB software.

If you would like to change the name or location of your company file, click Change.
Click the Next button to create your new company file.

MYOB Compnay Files: Activate, Backup, Deactivation, Reactivation

After creating a company file you will need to activate the file within 30 days or less. If you have not yet activated the company file, you will get a activation window which reads:

( )Activate online
( )Activate by phone
( )Activate later
( )Mark as Read Only

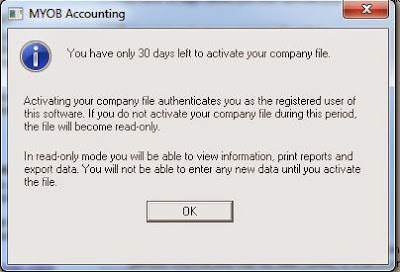
If you chose Activate later, you will get a Activation days remaining window telling you how many days you have left to activate the file.

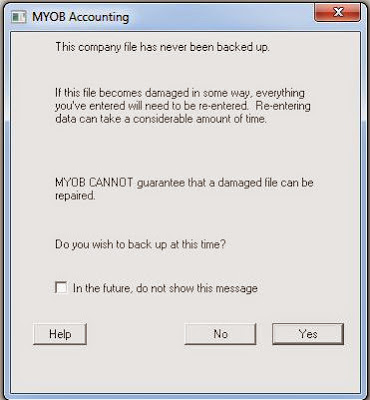
On clicking OK exiting that window, you will get a file backup window which says

This company file has never been backed up.

If this file becomes damaged in some ways, everything you've entered will need to be re-entered. Re-entering data can take a considerable amount of time.

MYOB CANNOT guarantee that a damaged file can be repaired.

Do you wish to back up at this time?

[ ] In the future, do not show this message.

[Help] [No] [Yes]

Significance

Supposed Company A is closed, and you don't want it anymore, you can make it READ ONLY and delete the company file. But even if deleted from your computer, the file will still remain in MYOB systems and included in the quota of maximum 5 free company files and will be read-only.

Company B created

Maximum free 5 company files. However can buy more quota with each block of 5 files costing RM59 for Malaysia and S$61 for Singapore

How company files activation works
email
phone internet
letter

Activate file window
MYOB Activate your company file window
MYOB Activate Your Company File Window

MYOB Activate Company File Reminder Winow


Backup file Reminder
align="center" cellpadding="0" cellspacing="0" class="tr-caption-container" style="margin-left: auto; margin-right: auto; text-align: center;">
MYOB company files backup reminder window

Setup Accounts List & Familiarization/Customization

When setting up Company Files, you would have opted for a preset Accounts List or built your own.

Now we want to familiarize ourselves with or customize the Accounts List. To get to the Accounts List, load MYOB, open a company file and thus get to the Command Centre where you see the Accounts tab. Click on Accounts and a cascading list appears. Click Accounts List and the Accounts List is displayed (Note that you can also get to the Accounts List by clicking LIST in the Menu Bar and selecting ACCOUNTS):

MYOB Accounts List
MYOB Company Accounts List

You will initially be in the ALL ACCOUNTS tab in the Accounts List Window resulting in the whole list of accounts to be displayed as shown in the screenshot above. Note that there are altogether 9 tabs in the Accounts List window:
All Accounts | Asset | Liabilit | Equity | Income | Cost of Sales | Expense | Other Income | Other Expenses

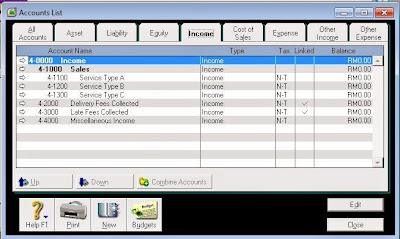
By clicking the appropriate tab the Accounts List will be filtered to show only accounts belonging to that tab. For example, you click on the INCOME tab. All the accounts belonging to the Income category will appear:

MYOB Accounts List filtered according to category

Note that those accounts are all placed at different levels, Level 1, Level 2, Level 3, Level 4
Example
1-0000 Level 1
1-1000 Level 2
1-1100 Level 3
1-1110 Level 4

The account can either be a Header account or a Detailed account
Bold: header account
not bold: Detailed

You can see the Profile and edit the account by clicking the arrow to the left
You can also delete the account by clicking the arrow then in the Menu bar at the top, click
Edit > Delete Account

At the bottom, there will be 4 tabs:
Help F1 | Print | New | Budgets

If you want to create a new Account or recreate one you deleted earlier by clicking the NEW tab.
Reporting: generate a sub-total
Details: see linked accounts. If linked to many other accounts, difficult to delete

Edit Accounts window—Profile view

The Edit Accounts window allows you to add new accounts and make changes to existing accounts in your accounts list.

In the Profile view, you can choose whether the account is a header or detail account, select the type of account (asset, liability, equity, income, etc.), and assign it a unique number and name.

Field Descriptions

Account Number and Name

This field appears only when you edit an existing account or enter an account number for a new account; when you first open this window to enter a new account, this field is blank.
This field displays the number and name of the account.

Current Balance

This field displays the current balance of this account. If this is a header account, this field displays the sum of all the detail accounts assigned to it.
If this is an asset, liability or equity account, the amount shown here is the value of the account. If this is an income, expense, cost of sales, other income or other expense account, the amount shown here is the total of all activity with the account since the beginning of the current financial year.
If this is a detail account and you want to view more information about the account balance, click the zoom arrow. The Find Transactions window will appear, listing the transactions that make up the current balance.
If you’re viewing the equity account named Current Year Earnings, the current balance displayed is your company’s year-to-date profit or loss amount.

Inactive Account

Select this option if you want to deactivate the account—for example, if you rarely use the account or you don't want it to appear in selection lists. If you make the account inactive, existing transactions are not affected and you can still enter new transactions for the account by manually selecting it in an account field.

Only detail accounts can be marked as inactive.

When you print the Accounts List [Summary] report or Accounts List [Detail] report, you have the option to omit inactive accounts.

Header or Detail Account

Specify the account as a Header Account or a Detail Account.

Header: Header accounts are used as titles of groups of accounts. They are used only for grouping accounts of a similar purpose and appear in this list for display and organisational purposes only. You can not create a budget for a header account.

Detail: Detail accounts are the Premier accounts that have transactions assigned to them. Each one is assigned to the header account that appears directly above it in the list. Detail accounts appear in plain type, and header accounts appear in bold type.

Account Classification

If you’re viewing an existing account’s information, the account’s classification appears here and is view-only. If you’re creating a new account, this field is blank until you select the Account Type; then the classification that corresponds to the selected type appears.

Account Type
If you’re viewing an existing account’s information, the account’s type appears here. If the account is a detail asset or liability account, all the account types for its classification appear in a list. You can change the type to another in the list.

Account Number

Account prefixes are not editable, but you can change the other four digits in an account number, provided the account number you choose is not already in use.
Any four digits except 0000 can be used in the account number. If you enter fewer than four digits, zeros will be added to the end of the number. When you enter an account number, the number will be automatically placed in the accounts list list in numerical order.

Account Name


Enter up to 30 characters to describe this account.

Opening Balance

Enter the balance of this account as of the first day of your conversion month. If an amount already appears in this field, you may have already entered an opening balance for this account in the Easy Setup Assistant or the Account Opening Balances window.

New

Click create a new account.

Budgets

Click to open the Prepare Budgets window where you can create monthly budgets for Detail accounts.

OK

Click to save your changes and close the window


MYOB Opening Company FIle Run Through

Let's run through what happens when we open a MYOB Company File.

1. Open MYOB > Select company file from Windows Explorer > Open
2. A MYOB Sign On Window will appear requiring you to enter your username and password
3. On signing in, an Company File Activation window will appear asking if you want to activate the company file
4. If you select "Activate Later" a Reminder Window will popup telling you that you have 30 days (less if you had created the file earlier)
5. If you select "OK" a Backup company file window"

MYOB Activate your company file window
MYOB Activate Your Company File Window

MYOB Activate Company File Reminder Winow

MYOB Company File Backup Window

About the MYOB Command Center

Accounts Command Centre

(see screenshot)
The Accounts command centre enables you to control all the account information and activities in your business. This includes creating new accounts, editing and removing existing accounts, editing account history amounts, exporting your accounts list to your accountant and establishing budgets.

As with any command centre, you can also click To Do List to display business tasks that affect your company on a regular basis, click Find Transactions to view summary information about transactions, click Reports to print or view reports, and click Analysis to analyse aspects of your business.

Accounts command centre main tasks
Other tasks in the Accounts command centre

Accounts Command Center Main Tasks

Accounts List
Click to open the Accounts List window, where you can create and edit the accounts in your company file. You can also create budgets and enter account history from the Accounts List window.

Send to Accountant

Click to open the Send to Accountant window, where you can export your account details and send them to your accountant.

Record Journal Entry

Click to open the Record Journal Entry window, where you can enter general journal entries such as depreciation, currency gains and losses, etc.

Company Data Auditor

Click to run the Company Data Auditor Assistant, which takes you through the process of checking the integrity of the data in your company file. Use the Company Data Auditor Assistant to check the accuracy of your company file data before sending it to your accountant.

Transfer Money

Click to open the Transfer Money window, where you can record a money transfer from one of your accounts to another.

Transaction Journal


Click to open the Transaction Journal window, where you can view the journal entry for all transactions you’ve entered in your company file. You can view the original transaction by clicking the zoom arrow next to a transaction.

Other tasks in the Accounts command centre


To Do List

Click to open the To Do List window, where you can view a list of tasks that need to be performed regularly, such as recording recurring transactions. You can also use the To Do List to automatically perform tasks, such as creating a purchase when an item’s quantity becomes low.

The To Do List window automatically displays tasks related to the current command centre. If you want to display a different task in the To Do List window, click the down arrow and select the required task from the list that appears.

Find Transactions

Click to open the Find Transactions window, where you can view summary information about accounts, invoices, bills, cards, items, payroll and jobs. You can click a zoom arrow in this window to display the original transaction details.

The Find Transactions window automatically displays the transaction type related to the current command centre. If you want to display a different type of transaction, click the search arrow and select the required transaction type from the list that appears.

Reports

Click to open the Index to Reports window, where you can prepare, print and customise your reports or export them to Microsoft Excel using the MYOB OfficeLink feature.
The Index to Reports window automatically displays reports related to the current command centre. If you want to display a different type of report, click the search arrow and select the required transaction type from the list that appears.

Analysis

Click to open windows that allow you to analyse the key aspects of your business. For example, you can analyse sales and profitability trends, estimate short-term cash needs, see who owes you money and chart your progress on jobs. Many Analyse windows display your company's information in table or graph form.

When you click Analysis, a window appears displaying an analysis of information related to the current command centre. If you want to display a different type of analysis, click the search arrow and select the required analysis from the list that appears.

MYOB Command Center
MYOB Command Center
=

MYOB: Setup: Tax Codes

To setup or access the Tax Code list, go to the menu bar at the top and click LISTS

Drop down menu will have the following choices
Accounts | Cards | Items | Jobs | Categories | Tax Codes | Recurring Transactions | Custom List & Field Names | Custom Lists | Sales & Purchases Information | Identifier

Click TAX CODES and the Tax Codes window revealing the whole Tax Code List pre-loaded by MYOB as per Royal Malaysian Customs.

MYOB Tax Codes Lists as per Royal Malaysian Customs

I have copied the whole list for your reference at MYOB Tax Codes List. It is accurate as of 3rd December 2014.

If you click on the arrow on the left of any code, a TAX CODE INFORMATION window will open showing various properties of that tax code (See screenshot below). Here various properties of that tax code will be display including what accounts the tax code is linked to. In this window too you can edit the tax code properties if you have information from the Royal Malaysian Customs and you know what you are doing or you didn't subscribe to MYOB 1 year support, you can edit it yourself if Royal Malaysian Custom make changes. Otherwise leave it alone and let MYOB update it for you.

For example, you click the arrow to the left of SR (Standard Rated Supplies), the properties window for SR will pop up:

MYOB Malaysian Custom Tax Code Information


MYOB tax code list as per Royal Malaysian Customs

MYOB Malaysia has already prepared and included in MYOB software all the Tax Code as per Royal Malaysian Customs (Jabatan Kastam Diraja Malaysia). As of 3rd December 2014, the whole tax code list in MYOB Malaysia is reproduced below:.

If Custom changes anything, MYOB will update the list for you if you are subscribed for their year support. Otherwise, subscribe to update from Royal Malaysian Custom for GST and if there are changes, you can edit the list yourself.
  Code Description Tax Type Rate
1 AJP Adjustment to Input Tax GST 6%
2 AJS Adjustment to Output Tax GST 6%
3 BL Purchases (GST not claimable) GST 6%
4 DS Deemed Supplies GST 6%
5 E43 Incidental exempt supp (TX-E43) GST 6%
6 EP Purchases exempted from GST GST 0%
7 ES Except Supplies under GST GST 0%
8 ESI Incidental exempt supp (ES43) GST 0%
9 ESN Non-inc exempt (ESN43) GST 0%
10 GP Disregarded Purchases GST 0%
11 GS Disregarded Supplies under GST GST 0%
12 IM GST for import of goods GST 6%
13 IMO GST for import of goods at 0% GST 0%
14 IS Import under special scheme GST 0%
15 IS6 Import under special scheme at GST 6%
16 N-T Non Taxable Sales Tax 0%
17 N43 Non-inc exempt supp (TX-N43) GST 6%
18 NR Non GST registered supplier GST 0%
19 OP Purchase (Out of Scope) GST 0%
20 OS Supplies (Out of Scope) GST 0%
21 RE Taxable or Except supplies GST 6%
22 RS Relief Supplies under GST GST 0%
23 SR Standard-rated supplies (GST 6%) GST 6%
24 T Taxable Sales Tax 5%
25 TX Purchases with GST at 6% GST 6%
26 ZP Purchases with no GST incurred GST 0%
27 ZER Export zero rated supplies GST 0%
28 ZRL Zero rated supplies GST 0%

Search This Blog